
Python 常見部署方法有 :
- fcgi :用 spawn-fcgi 或者框架自帶的工具對各個 project 分別生成監聽進程,然後和 http 服務互動
- wsgi :利用 http 服務的 mod_wsgi 模塊來跑各個 project(Web 應用程序或框架簡單而通用的 Web 服務器 之間的接口)。
- uWSGI 是一款像 php-cgi 一樣監聽同一端口,進行統一管理和負載平衡的工具,uWSGI,既不用 wsgi 協議也不用 fcgi 協議,而是自創了一個 uwsgi 的協議,據說該協議大約是 fcgi 協議的 10 倍那麼快。
其實 WSGI 是分成 server 和 framework (即 application) 兩部分 (當然還有 middleware)。嚴格說 WSGI 只是一個協議, 規範 server 和 framework 之間連接的接口。
WSGI server 把服務器功能以 WSGI 接口暴露出來。比如 mod_wsgi 是一種 server, 把 apache 的功能以 WSGI 接口的形式提供出來。
- WSGI framework 就是我們經常提到的 Django 這種框架。不過需要注意的是, 很少有單純的 WSGI framework , 基於 WSGI 的框架往往都自帶 WSGI server。比如 Django、CherryPy 都自帶 WSGI server 主要是測試用途, 發佈時則使用生產環境的 WSGI server。而有些 WSGI 下的框架比如 pylons、bfg 等, 自己不實現 WSGI server。使用 paste 作為 WSGI server。
- Paste 是流行的 WSGI server, 帶有很多中間件。還有 flup 也是一個提供中間件的庫。
- 搞清除 WSGI server 和 application, 中間件自然就清楚了。除了 session、cache 之類的應用, 前段時間看到一個 bfg 下的中間件專門用於給網站換膚的 (skin) 。中間件可以想到的用法還很多。
- 這裡再補充一下, 像 django 這樣的框架如何以 fastcgi 的方式跑在 apache 上的。這要用到 flup.fcgi 或者 fastcgi.py (eurasia 中也設計了一個 fastcgi.py 的實現) 這些工具, 它們就是把 fastcgi 協議轉換成 WSGI 接口 (把 fastcgi 變成一個 WSGI server) 供框架接入。整個架構是這樣的: django -> fcgi2wsgiserver -> mod_fcgi -> apache 。
- 雖然我不是 WSGI 的粉絲, 但是不可否認 WSGI 對 python web 的意義重大。有意自己設計 web 框架, 又不想做 socket 層和 http 報文解析的同學, 可以從 WSGI 開始設計自己的框架。在 python 圈子裡有個共識, 自己隨手搞個 web 框架跟喝口水一樣自然, 非常方便。或許每個 python 玩家都會經歷一個倒騰框架的
uWSGI 的主要特點如下:
- 超快的性能。
- 低內存佔用(實測為 apache2 的 mod_wsgi 的一半左右)。
- 多app管理。
- 詳盡的日誌功能(可以用來分析 app 性能和瓶頸)。
- 高度可定制(內存大小限制,服務一定次數後重啟等)。
uwsgi 的官方文檔:
http://projects.unbit.it/uwsgi/wiki/Doc
nginx.conflocation / { include uwsgi_params uwsgi_pass 127.0.0.1:9090} 啟動 app
uwsgi -s :9090 -w myapp
uwsgi 的調優參數~
uwsgi 的參數以上是單個 project 的最簡單化部署,uwsgi 還是有很多令人稱讚的功能的,例如:並發 4 個線程: uwsgi -s :9090 -w myapp -p 4主控制線程 +4 個線程: uwsgi -s :9090 -w myapp -M -p 4執行超過 30 秒的 client 直接放棄: uwsgi -s :9090 -w myapp -M -p 4 -t 30限制內存空間 128M: uwsgi -s :9090 -w myapp -M -p 4 -t 30 --limit-as 128服務超過 10000 個 req 自動 respawn: uwsgi -s :9090 -w myapp -M -p 4 -t 30 --limit-as 128 -R 10000後台運行等: uwsgi -s :9090 -w myapp -M -p 4 -t 30 --limit-as 128 -R 10000 -d uwsgi.log
為了讓多個站點共享一個 uwsgi 服務,必須把 uwsgi 運行成虛擬站點:去掉「-w myapp」加上」–vhost」:
uwsgi -s :9090 -M -p 4 -t 30 --limit-as 128 -R 10000 -d uwsgi.log --vhost
然後必須配置 virtualenv,virtualenv 是 Python 的一個很有用的虛擬環境工具,這樣安裝:
最後配置 nginx,注意每個站點必須單獨佔用一個 server,同一 server 不同 location 定向到不同的應用不知為何總是失敗,估計也 算是一個 bug。
server { listen 80; server_name app1.mydomain.com; location / { include uwsgi_params; uwsgi_pass 127.0.0.1:9090; uwsgi_param UWSGI_PYHOME /var/www/myenv; uwsgi_param UWSGI_SCRIPT myapp1; uwsgi_param UWSGI_CHDIR /var/www/myappdir1; }}server { listen 80; server_name app2.mydomain.com; location / { include uwsgi_params; uwsgi_pass 127.0.0.1:9090; uwsgi_param UWSGI_PYHOME /var/www/myenv; uwsgi_param UWSGI_SCRIPT myapp2; uwsgi_param UWSGI_CHDIR /var/www/myappdir2; }} 這樣,重啟 nginx 服務,兩個站點就可以共用一個 uwsgi 服務了。
再來搞下 fastcgi 的方式
location / {fastcgi_param REQUEST_METHOD $request_method;fastcgi_param QUERY_STRING $query_string;fastcgi_param CONTENT_TYPE $content_type;fastcgi_param CONTENT_LENGTH $content_length;fastcgi_param GATEWAY_INTERFACE CGI/1.1;fastcgi_param SERVER_SOFTWARE nginx/$nginx_version;fastcgi_param REMOTE_ADDR $remote_addr;fastcgi_param REMOTE_PORT $remote_port;fastcgi_param SERVER_ADDR $server_addr;fastcgi_param SERVER_PORT $server_port;fastcgi_param SERVER_NAME $server_name;fastcgi_param SERVER_PROTOCOL $server_protocol;fastcgi_param SCRIPT_FILENAME $fastcgi_script_name;fastcgi_param PATH_INFO $fastcgi_script_name;fastcgi_pass 127.0.0.1:9002;} location /static/ {root /path/to/www;if (-f $request_filename) { rewrite ^/static/(.*)$ /static/$1 break;} } 啟動一個 fastcgi 的進程
spawn-fcgi -d /path/to/www -f /path/to/www/index.py -a 127.0.0.1 -p 9002
用 web.py 寫的一個小 demo 測試
#!/usr/bin/env python # -*- coding: utf-8 -*-import weburls = ("/.*", "hello")app = web.application(urls, globals)class hello: def GET(self):return \'Hello, world!\'if __name__ == "__main__": web.wsgi.runwsgi = lambda func, addr=None: web.wsgi.runfcgi(func, addr) app.run 啟動 nginx
nginx
這樣就 ok 了~
下面開始介紹下 我一般用的方法:
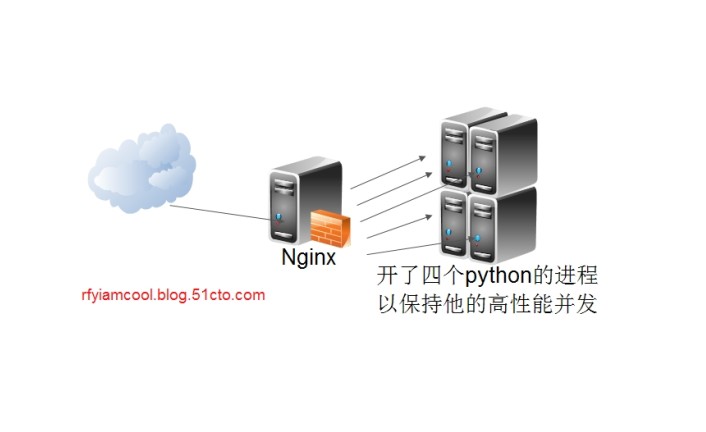
圖片 2.1 pic
前端 nginx 用負責負載分發:
部署的時候採用了單 IP 多端口方式,服務器有 4 個核心,決定開 4 個端口對應,分別是 8885~8888,修改
upstream backend {server 127.0.0.1:8888;server 127.0.0.1:8887;server 127.0.0.1:8886;server 127.0.0.1:8885;} server{listen 80;server_name message.test.com;keepalive_timeout 65; #proxy_read_timeout 2000; #sendfile on;tcp_nopush on;tcp_nodelay on; location / {proxy_pass_header Server;proxy_set_header Host $http_host;proxy_redirect off;proxy_set_header X-Real-IP $remote_addr;proxy_set_header X-Scheme $scheme;proxy_pass http://backend;}} 然後運行四個 python 程序,端口為咱們配置好的端口
我這裡用 tornado 寫了一個執行系統程序的例子:
import subprocessimport tornado.ioloopimport timeimport fcntlimport functoolsimport osclass GenericSubprocess (object): def __init__ ( self, timeout=-1, **popen_args ):self.args = dictself.args["stdout"] = subprocess.PIPEself.args["stderr"] = subprocess.PIPEself.args["close_fds"] = Trueself.args.update(popen_args)self.ioloop = Noneself.expiration = Noneself.pipe = Noneself.timeout = timeoutself.streams = self.has_timed_out = False def start(self):"""Spawn the task.Throws RuntimeError if the task was already started."""if not self.pipe is None: raise RuntimeError("Cannot start task twice")self.ioloop = tornado.ioloop.IOLoop.instanceif self.timeout > 0: self.expiration = self.ioloop.add_timeout( time.time + self.timeout, self.on_timeout )self.pipe = subprocess.Popen(**self.args)self.streams = [ (self.pipe.stdout.fileno, ), (self.pipe.stderr.fileno, ) ]for fd, d in self.streams: flags = fcntl.fcntl(fd, fcntl.F_GETFL)| os.O_NDELAY fcntl.fcntl( fd, fcntl.F_SETFL, flags) self.ioloop.add_handler( fd, self.stat, self.ioloop.READ|self.ioloop.ERROR) def on_timeout(self):self.has_timed_out = Trueself.cancel def cancel (self ) :"""Cancel task executionSends SIGKILL to the child process."""try: self.pipe.killexcept: pass def stat( self, *args ):\'\'\'Check process completion and consume pending I/O data\'\'\'self.pipe.pollif not self.pipe.returncode is None: \'\'\'cleanup handlers and timeouts\'\'\' if not self.expiration is None:self.ioloop.remove_timeout(self.expiration) for fd, dest in self.streams:self.ioloop.remove_handler(fd) \'\'\'schedulle callback (first try to read all pending data)\'\'\' self.ioloop.add_callback(self.on_finish)for fd, dest in self.streams: while True:try: data = os.read(fd, 4096) if len(data) == 0:break dest.extend([data])except: break @property def stdout(self):return self.get_output(0) @property def stderr(self):return self.get_output(1) @property def status(self):return self.pipe.returncode def get_output(self, index ):return "".join(self.streams[index][1]) def on_finish(self):raise NotImplementedclass Subprocess (GenericSubprocess): """Create new instance Arguments:callback: method to be called after completion. This method should take 3 arguments: statuscode(int), stdout(str), stderr(str), has_timed_out(boolean)timeout: wall time allocated for the process to complete. After this expires Task.cancel is called. A negative timeout value means no limit is set The task is not started until start is called. The process will then be spawned using subprocess.Popen(**popen_args). The stdout and stderr are always set to subprocess.PIPE. """ def __init__ ( self, callback, *args, **kwargs):"""Create new instanceArguments: callback: method to be called after completion. This method should take 3 arguments: statuscode(int), stdout(str), stderr(str), has_timed_out(boolean) timeout: wall time allocated for the process to complete. After this expires Task.cancel is called. A negative timeout value means no limit is setThe task is not started until start is called. The process will then be spawned using subprocess.Popen(**popen_args). The stdout and stderr are always set to subprocess.PIPE."""self.callback = callbackself.done_callback = FalseGenericSubprocess.__init__(self, *args, **kwargs) def on_finish(self):if not self.done_callback: self.done_callback = True \'\'\'prevent calling callback twice\'\'\' self.ioloop.add_callback(functools.partial(self.callback, self.status, self.stdout, self.stderr, self.has_timed_out))if __name__ == "__main__": ioloop = tornado.ioloop.IOLoop.instance def print_timeout( status, stdout, stderr, has_timed_out) :assert(status!=0)assert(has_timed_out)print "OK status:", repr(status), "stdout:", repr(stdout), "stderr:", repr(stderr), "timeout:", repr(has_timed_out) def print_ok( status, stdout, stderr, has_timed_out) :assert(status==0)assert(not has_timed_out)print "OK status:", repr(status), "stdout:", repr(stdout), "stderr:", repr(stderr), "timeout:", repr(has_timed_out) def print_error( status, stdout, stderr, has_timed_out):assert(status!=0)assert(not has_timed_out)print "OK status:", repr(status), "stdout:", repr(stdout), "stderr:", repr(stderr), "timeout:", repr(has_timed_out) def stop_test:ioloop.stop t1 = Subprocess( print_timeout, timeout=3, args=[ "sleep", "5" ] ) t2 = Subprocess( print_ok, timeout=3, args=[ "sleep", "1" ] ) t3 = Subprocess( print_ok, timeout=3, args=[ "sleepdsdasdas", "1" ] ) t4 = Subprocess( print_error, timeout=3, args=[ "cat", "/etc/sdfsdfsdfsdfsdfsdfsdf" ] ) t1.start t2.start try:t3.startassert(false) except:print "OK" t4.start ioloop.add_timeout(time.time + 10, stop_test) ioloop.start 大家可以先用 uwsgi,要還是有壓力和堵塞的話,可以用用 nginx 做負載。
我自己的經驗來看還是這個靠譜~